- Published on
Next.js 와 CDN, 그리고 standalone 과 custom server
NEXT.JS와 CDN 연동하기
Next.js 와 CDN을 연동하는 방법은 Next.js 에서 제공하는 옵션인 assetPrefix 를 사용하면 된다.
next.config.js 에 아래와 같이 assetPrefix 를 설정하면 된다.
const nextConfig = {
    assetPrefix: 'CDN_PATH',
    ...
}
그리고 next build 명령어를 사용하여 빌드했을 때 생성되는 .next 폴더 내부의 static 폴더를 CDN의 origin 에 업로드 하면 된다.
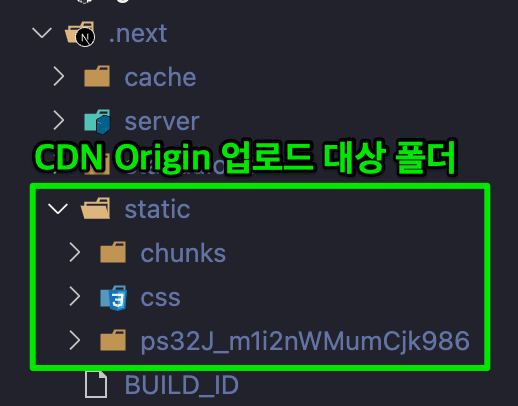
Origin에 업로드할 때, .next/static이 아닌, _next/static으로 파일 경로를 변경해서 올려야 정상적으로 동작한다.
그러면 사용자가 페이지 진입 시 요청한 첫번째 요청을 NEXT.JS 서버에 의해서 SSR로 렌더링해서 내려주고, 그 외의 페이지를 렌더링하기 위해 필요한 JS와 CSS파일은 CDN을 통해서 제공된다.
next build -> static upload 완료 후 구동하는 next.js 서버 docker 파일은 이쪽 을 참고한다.
NEXT.JS와 도커 이미지 경량화하기
Next.js 를 컨테이너로 배포할 때 이미지를 경량화하는 방법은 Next.js 에서 제공하는 output: 'standalone' 옵션을 사용하면 된다.
이를 통해 node_modules를 모두 사용하지 않고 production 환경에 필요한 파일만 사용하도록 추출해준다.
next.config.js 에 아래와 같이 output: standalone 옵션을 추가하면 된다.
const nextConfig = {
    output: 'standalone',
    ...
}
위 옵션을 설정하고 next build 명령어를 사용하여 빌드를 하면, .next 폴더 하위에 standalone 폴더가 생성되고, 이 폴더만을 사용하여 NEXT.JS 서버를 운영할 수 있다.
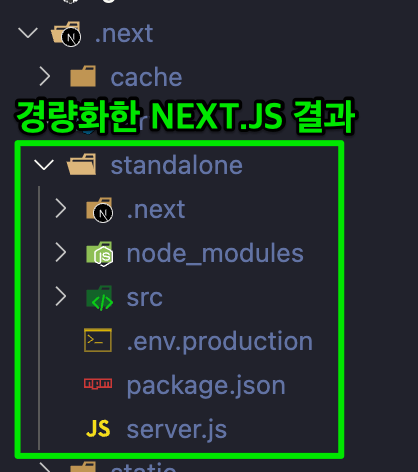
컨테이너를 위한 이미지를 생성할 때에는 standalone Dockerfile 예제 처럼, standalone 폴더와, public 폴더, 환경 변수 등 구동에 필요한 파일만을 포함하여 이미지를 생성하면 된다.
이미지 경량화를 통해 이미지를 pull 하는 시간을 줄일 수 있고, 그만큼 배포시간도 단축된다.
Custom Server
Custom Server 를 통해 Next.js의 기본 서버를 대체할 수 있다.
Custom Server 에서 로깅이나 응답, 요청에 추가적인 미들웨어를 설정할 수 있다.
아래 Custom Server 구현을 참고한다.
import { parse } from 'node:url';

import dotenv from 'dotenv';
import express from 'express';
import helmet from 'helmet';
import { createServer } from 'http';
import { createProxyMiddleware } from 'http-proxy-middleware';
import next from 'next';
import * as path from 'path';
import promClient from 'prom-client';

import env from './env';
import { createLogger } from './logger';

const dir = process.env.NX_NEXT_DIR || path.join(__dirname, '..');
const dev = process.env.NODE_ENV === 'development';
const hostname = process.env.HOST || '0.0.0.0';
const port = process.env.PORT ? parseInt(process.env.PORT) : 4200;
const phase = process.env.NEXT_PUBLIC_PHASE || 'dev';

dotenv.config();

//import .env.dev
if (phase === 'dev') {
  const appRoot = path.resolve(
    process.env.NX_WORKSPACE_ROOT || '',
    'apps/test'
  );

  dotenv.config({
    path: path.resolve(appRoot, '.env.dev'),
  });
}

const proxyLogger = createLogger('Proxy');
const accessLogger = createLogger('Access');

const httpRequestCounter = new promClient.Counter({
  name: 'nodejs_http_request_total',
  help: 'Total count of NodeJS HTTP requests',
  labelNames: ['method', 'route', 'statusCode'],
});
const responseTimeHistogram = new promClient.Histogram({
  name: 'nodejs_response_duration_seconds',
  help: 'NodeJS response duration in seconds',
  labelNames: ['method', 'route', 'statusCode'],
  buckets: [0.05, 0.1, 0.25, 0.5, 1.0, 2.5, 5.0, 10.0, 20.0],
});

promClient.register.registerMetric(httpRequestCounter);
promClient.register.registerMetric(responseTimeHistogram);

promClient.collectDefaultMetrics({
  register: promClient.register,
});

async function main() {
  const nextApp = next({ dev, dir });
  const handle = nextApp.getRequestHandler();

  await nextApp.prepare();

  const app = express();
  const server = createServer(
    { keepAlive: true, keepAliveTimeout: 15000 },
    app
  );

  app.use(helmet.hsts());
  app.use(
    '/proxy',
    createProxyMiddleware({
      target: env.API_DOMAIN,
      changeOrigin: true,
      followRedirects: true,
      on: {
        proxyReq: (proxyReq, req, res) => {
          proxyLogger(req, res);
        },
      },
    })
  );

  app.get('/metrics', async (req, res) => {
    res.setHeader('Content-Type', promClient.register.contentType);
    res.setHeader('Cache-Control', 'no-store');
    const metrics = await promClient.register.metrics();

    res.send(metrics);
  });

  app.use((req, res, next) => {
    const isSecure = req.secure;
    const xForwardedProto = req.headers['x-forwarded-proto'] || '';
    const isFromHttps = xForwardedProto.includes('https');
    const isProduction = process.env.NODE_ENV === 'production';
    const isL7CheckReq = getIsL7Check(req.url);

    if (!isL7CheckReq) {
      if (!(isSecure || isFromHttps) && isProduction) {
        return res.redirect(`https://${req.get('Host')}${req.url}`);
      }
    }

    next();
  });

  app.use((req, res, next) => {
    const isL7CheckReq = getIsL7Check(req.url);
    const isMetricsReq = getIsMetrics(req.url);

    if (!isL7CheckReq && !isMetricsReq) {
      const labels = {
        method: req.method,
        route: req.path,
        statusCode: res.statusCode,
      };
      httpRequestCounter.labels(labels).inc();

      const endTime = responseTimeHistogram.startTimer();
      res.on('finish', () => {
        endTime(labels);
      });
    }

    next();
  });

  app.use(async (req, res) => {
    const parsedUrl = parse(req.url, true);
    const isL7CheckReq = getIsL7Check(req.url);
    const isStaticReq = getIsStaticPath(req.url);
    const isFaviconReq = getIsFavicon(req.url);

    if (!isL7CheckReq && !isStaticReq && !isFaviconReq) {
      accessLogger(req, res);
    }

    await handle(req, res, parsedUrl);
  });

  server.listen(port, hostname, () => {
    console.log(
      `[ ready ] - [${phase}] listening on http://${hostname}:${port}`
    );
  });
}

main().catch((err) => {
  console.error(err);
  process.exit(1);
});

function getIsL7Check(url: string) {
  return url === '/api/l7check';
}

function getIsMetrics(url: string) {
  return url === '/metrics';
}

function getIsStaticPath(url: string) {
  return url.includes('/_next/static') || url.includes('/images');
}

function getIsFavicon(url: string) {
  return url.includes('.ico');
}
커스텀 서버는 Next.js의 빌드와 별도의 프로세스이므로 별도의 dev server, build script를 작성해주어야 한다.
다음과 같이 project.json 에서 작성한 내용을 참고한다.
{
  "build-custom-server": {
    "executor": "@nx/js:tsc",
    "defaultConfiguration": "production",
    "options": {
      "outputPath": "dist/apps/test",
      "main": "apps/test/server/main.ts",
      "tsConfig": "apps/test/tsconfig.server.json",
      "clean": false,
      "assets": []
    },
    "configurations": {
      "development": {},
      "production": {}
    }
  },
  "serve-custom-server": {
    "executor": "@nx/js:node",
    "defaultConfiguration": "production",
    "options": {
      "buildTarget": "test:build-custom-server"
    },
    "configurations": {
      "development": {
        "buildTarget": "test:build-custom-server:development"
      },
      "production": {
        "buildTarget": "test:build-custom-server:production"
      }
    }
  }
}
Docker file 작성시에도 Custom Server를 고려하여 별도로 처리가 필요하다.
standalone + custom server 를 사용하는 경우 Dockerfile 예제 를 참고한다.
예제에서는 다음과 같이 운영에 필요한 파일을 복사한다.
- standalone, public 폴더 copy
- cusom server 빌드 결과물 copy
- custom server 에서 추가로 필요한 module을 직접 node_modules 에서 부분적으로 copy