- Published on
Sentry로 FE 에러 추적하기
오류를 탐지하기 위한 FE 모니터링 툴인 Sentry가 제공하는 기능과 사용방법에 대해 알아본다.
Sentry는 다음과 같이 이벤트 로그에 대한 다양한 정보를 제공한다.
-
Exception & Message : 이벤트 로그 메시지 및 코드 라인 정보 (source map 설정을 해야 정확한 코드라인을 파악할 수 있음)
-
Device : 이벤트 발생 장비 정보 (name, family, model, memory 등)
-
Browser : 이벤트 발생 브라우저 정보 (name, version 등)
-
OS : 이벤트 발생 OS 정보 (name, version, build, kernelVersion 등)
-
Breadcrumbs : 이벤트 발생 과정
또한 Performance Monitoring 기능도 제공한다.
그러면 사용방법에 대해 알아보자.
install & configure
install
Sentry 사용에 필요한 패키지를 설치한다.
Sentry는 애플리케이션 런타임 내에서 SDK를 사용하여 데이터를 캡쳐하기 때문에 @sentry/react, @sentry/tracing 패키지를 설치해야 한다.
# using npm
npm install --save @Sentry/react @Sentry/tracing

# using yarn
yarn add @Sentry/react @Sentry/tracing
configure
import React from 'react';
import ReactDOM from 'react-dom';
import { createBrowserHistory } from 'history';
import * as Sentry from '@Sentry/react';
import { BrowserTracing } from '@Sentry/tracing';
import App from './App';

const history = createBrowserHistory();

Sentry.init({
  dsn: 'dsn key',
  release: 'release version',
  environment: 'production',
  integrations: [
    new BrowserTracing({
      routingInstrumentation: Sentry.reactRouterV5Instrumentation(history),
    }),
  ],
  autoSessionTracking: false,
  tracesSampleRate: 1.0,
  beforeBreadcrumb(breadcrumb, hint) {
    return breadcrumb.category === 'ui.click' ? null : breadcrumb;
  },
});

ReactDOM.render(<App />, document.getElementById('root'));
Sentry 설정에 필요한 기본 정보는 다음과 같다.
- dsn: 이벤트를 전송하기 위한 식별 키
- release: 애플리케이션 버전 (보통 package.json에 명시한 버전을 사용. 이는 버전별 오류 추적을 용이하게 한다.)
- environment: 애플리케이션 환경 (dev, production 등)
- integrations: 플랫폼 SDK별 통합 구성 설정
- BrowserTracing을 통해 pageload/navigation/HTTP request 과정을 추적하여 성능의 병목 구간을 추적할 수 있다.
- React의 경우 BrowserTracing - routingInstrumentation에 React Router Integration을 설정 하면된다.
- path parameter가 있는 경우에도 동일한 route로 sentry에서 처리하도록 React Router Integration - Parameterized Transaction Names 의 아래 부분을 참고하여 설정해주었다.
- ex) account/saving/1, account/saving/2 는 sentry에서 동일하게 account/saving/:accountId 로 처리 -> 이는 Page별 성능분석을 할때 필요하다
   import { Route, Router, Switch, matchPath } from 'react-router-dom';
   import { createBrowserHistory } from 'history';
   import * as Sentry from '@sentry/react';

   const history = createBrowserHistory();

   // Array of Route Config Objects
   // Make sure the order of the routes is correct. The longest url under the same parent should be placed first and in decreasing order.
   const routes = [{ path: '/users/:userid' }, { path: '/users' }, { path: '/' }];

   Sentry.init({
      integrations: [
        new Sentry.BrowserTracing({
          routingInstrumentation: Sentry.reactRouterV5Instrumentation(history, routes, matchPath),
        }),
      ],
      // We recommend adjusting this value in production, or using tracesSampler
      // for finer control
      tracesSampleRate: 1.0,
   });
- tracesSampleRate : performance monitoring을 추적하는 비율 (0.0 ~ 1.0로 설정 가능)
- dev환경에서는 1.0로 테스트하고, production에서는 낮게 설정하는 것을 권고하고 있다. 자세한 내용은 Set Up Performance을 참고
- autoSessionTracking : release 버전별 crash비율, 에러증가율과 같은 Release Health 정보를 수집한다. sentry v6부터 default true로 동작한다. request 트래픽을 많이 유발 (route redirect 시 마다 2건의 request 발생) 할 수 있으므로, 꼭 필요한 정보가 아니라면 false로 설정한다.
hooks 설정도 지원하고 있는데, Sentry에 이벤트를 전송하기 전에 이벤트를 선택적으로 수정해서 데이터를 보낼 수 있는 beforeSend, beforeBreadcrumb와 같은 옵션도 제공하고 있다.
이 밖에 다양한 기본 설정 옵션은 Confiure Basic Options 를 참고한다.
Capture errors
Sentry는 기본적으로 Unhandled errors를 캡쳐한다.
직접 에러를 handling하여 이벤트를 전송하고 싶다면 Sentry는 captureException과 captureMessage 두 가지 이벤트 전송 API를 제공한다. 두 API는 다음과 같은 특성을 가지고 있다.
- captureException: error 객체나 문자열 전송 가능
try {
  aFunctionThatMightFail();
} catch (err) {
  Sentry.captureException(err, {
    level: Severity.Error,
    tags: {
      feature: 'transfer',
    },
  });
}
- captureMessage: 문자열 전송 가능
Sentry.captureMessage('error messages', captureContext);
또한 captureException과 captureMessage를 사용할때 context도 같이 전달가능하다. (참고: passing-context-directly)
tags, extra, contexts, user, level, fingerprint 를 context key로 전달 할 수 있다.
데이터 추가하기
Scope
Sentry는 scope 단위로 이벤트 데이터를 관리한다. 이벤트가 전송되면 해당 이벤트의 데이터를 현재 scope의 추가 정보와 병합한다.
Sentry에서의 scope는 configureScope와 withScope 두 가지로 나누어 설정할 수 있다.
- configureScope
configureScope 설정은 글로벌 scope와 비슷한 맥락으로 현재 범위 내에서 데이터를 재구성하는데 사용한다.
이벤트 전송에 있어 공통적으로 사용되는 정보가 있다면 이 설정을 사용하여 다음과 같이 구성할 수 있다.
import * as Sentry from '@Sentry/react';

Sentry.configureScope((scope: Sentry.Scope) => {
  scope.setUser({
    id: 10,
    email: 'test@example.com',
  });
  scope.setTag('app', process.env.APPLICATION_NAME);
});
- withScope
withScope 설정은 로컬 scope로 한 번의 범위 내에서 데이터를 재구성할 때 사용한다.
아래 예제에서 마지막 라인의 captureException에서는 withScope에서 설정한 Tag, Level 정보가 전송되지 않는다.
import * as Sentry from '@Sentry/react';
Sentry.withScope((scope: Sentry.Scope) => {
  scope.setTag('my-tag', 'my value');
  scope.setLevel(Sentry.Severity.Warning);
  Sentry.captureException(new Error('my 에러'));
});
Sentry.captureException(new Error('일반 에러'));
Context
context는 이벤트에 임의의 데이터를 연결 할 수 있는 기능이다. 검색은 할 수 없고 아래와 같이 해당 이벤트가 발생한 이벤트 로그에서 확인할 수 있다.

scope에 따라 설정가능하다. (scope.setContext)
Sentry.withScope((scope: Sentry.Scope) => {
  scope.setContext('API Request Detail', {
    method,
    url,
    params,
    data,
    headers,
  });
  Sentry.captureMessage('API Request');
});
이벤트 전송시 직접 추가(contexts)도 가능하다.
Sentry.captureException(err, {
  contexts: {
    detail: {
      method,
      url,
      params,
      data,
      headers,
    },
  },
});
Customized Tags
Sentry의 강력한 기능 중 하나인 tag는 키와 값이 쌍으로 이루어진 문자열이다.
tag는 인덱싱 되는 요소이기 때문에 관련한 이벤트에 빠르게 접근할 수 있고 이슈 검색이나 트래킹을 신속하게 진행할 수 있다. 또한 이슈의 이벤트에 대한 tag 분포를 확인할 수도 있다.
[tag로 검색]

[이슈정보에서 tag 추가 확인]

또한 이슈 알람을 받을 수 있는 조건에 특정 tag 조건을 설정하여 원하는 알람을 생성할 수도 있다.
tag를 설정하는 방법은 위에서 본 것처럼 scope에 따라 설정 가능하고, 이벤트 전송시 직접 추가(tags)도 가능하다.
Level
Sentry에서는 이벤트마다 level을 설정하여 이벤트의 중요도를 식별할 수 있다. 기본적으로 다음과 같은 에러 level을 정의하고 있다.
export declare enum Severity {
  Fatal = 'fatal',
  Error = 'error',
  Warning = 'warning',
  Log = 'log',
  Info = 'info',
  Debug = 'debug',
  Critical = 'critical',
}
Breadcrumbs
Breadcrumbs로 에러가 발생한 과정을 추적할 수 있다. Breadcrumbs를 추가하면 버퍼에 쌓아 두었다가 Sentry로 다음 이벤트를 전송할때 같이 보내진다.
While capturing an event, you can also record the breadcrumbs that lead up to that event. Breadcrumbs are different from events: they will not create an event in Sentry, but will be buffered until the next event is sent.
Breadcrumbs는 직접 만들수도 있고, Sentry SDK를 통해 자동으로 기록되기도 한다.
Automatic Breadcrumbs
Sentry SDK를 통해 자동으로 기록되는 breadcrumbs 이벤트들은 다음과 같다.
- 요소 click
- XHR request
- console
- navigation
요소 click breadcrumbs 개선
자동으로 기록될 때 요소 click 이벤트는 다음과 같이 css selector 로 기록되는데 어떤 버튼을 누른건지 알아보기가 어렵다.

그래서 element에 data-testid 속성이 있다면 이것으로 css selector 대신 보여주도록 다음과 같이 설정하였다.
sentryInit({
    ...
    beforeBreadcrumb(breadcrumb: Breadcrumb, hint?: BreadcrumbHint) {
        if (breadcrumb.category === 'ui.click') {
            // @ts-ignore
            // eslint-disable-next-line @typescript-eslint/no-unsafe-member-access
            const testId = (hint?.event?.target?.dataset?.testid || '') as string;
            if (testId) {
              breadcrumb.message = `testId: ${testId}`;
            }
        }
        return breadcrumb;
    },
})
위 설정을 적용하면 breadcrumbs - description에서 css selector 대신에 다음과 같이 "testId: xxx" 로 보여진다.

Manual Breadcrumbs
직접 Breadcrumb를 추가할 수도 있다.
아래에서 IBreadcrumb interface는 Breadcrumbs Interface를 참고하였다.
interface IBreadcrumb {
  type?: string;
  level?: Severity;
  eventId?: string;
  category?: string;
  message?: string;
  data?: {
    [key: string]: unknown;
  };
  timestamp?: number;
}

private _log(logLevel: ILevelKeys, msg: string) {
    if (this.currentLogLevel <= LOG_LEVEL[logLevel]) {
      const breadCrumb: IBreadcrumb = {
        level: logLevel,
        message: msg,
        timestamp: Math.floor(Date.now() / 1000),
      };

      if (DevUtility.isSentry()) {
        sentry.addBreadcrumb(breadCrumb);
        sentry.captureMessage(msg, {
          level: logLevel,
        });
      }
    }
}
Breadcrumbs에 대한 자세한 내용은 다음 문서를 참고한다.
오류 확장하기
Sentry에서 이슈 타이틀은 전송된 에러 객체의 name필드에 기반하고 있다.
(Sentry.captureException(err)로 에러 객체를 전송하였을 때)

물론 위에서 소개한 captureMessage를 이용하여 문자열만 이벤트로 전송하게 되면 에러 객체를 사용하지 않아도 된다.
그러나 stack trace등 오류에 대한 다양한 정보를 얻으려면 에러 객체를 이용하여 오류를 생성 및 핸들링하고 Sentry에 전송하는 것이 좋다.
API Error를 에러 status code 별로 Sentry에서 Title을 다르게 가져가고 싶다면 다음과 같이 에러객체를 확장시킬 수 있다.
class ApiError<T = unknown> extends Error implements AxiosError<T> {
  config: AxiosRequestConfig;
  code?: string;
  request?: any;
  response?: AxiosResponse<T>;
  isAxiosError: boolean;
  toJSON: () => any;
  constructor(error: AxiosError<T>, message?: string) {
    super(message ?? error.message);
    const errorStatus = error.response?.status || 0;
    let name = 'ApiError';
    switch (errorStatus) {
      case HTTP_STATUS.BAD_REQUEST: // 400
        name = 'ApiBadRequestError';
        break;
      case HTTP_STATUS.UNAUTHORIZED: // 401
        name = 'ApiUnauthorizedError';
        break;
      case HTTP_STATUS.FORBIDDEN: // 403
        name = 'ApiForbiddenError';
        break;
      case HTTP_STATUS.NOT_FOUND: // 404
        name = 'ApiNotFoundError';
        break;
      case HTTP_STATUS.INTERNAL_SERVER_ERROR: // 500
        name = 'ApiInternalServerError';
        break;
    }
  }
  this.name = name;
  this.stack = error.stack;
  this.config = error.config;
  this.code = error.code;
  this.request = error.request;
  this.response = error.response;
  this.isAxiosError = error.isAxiosError;
  this.toJSON = error.toJSON;
}
Dashboards
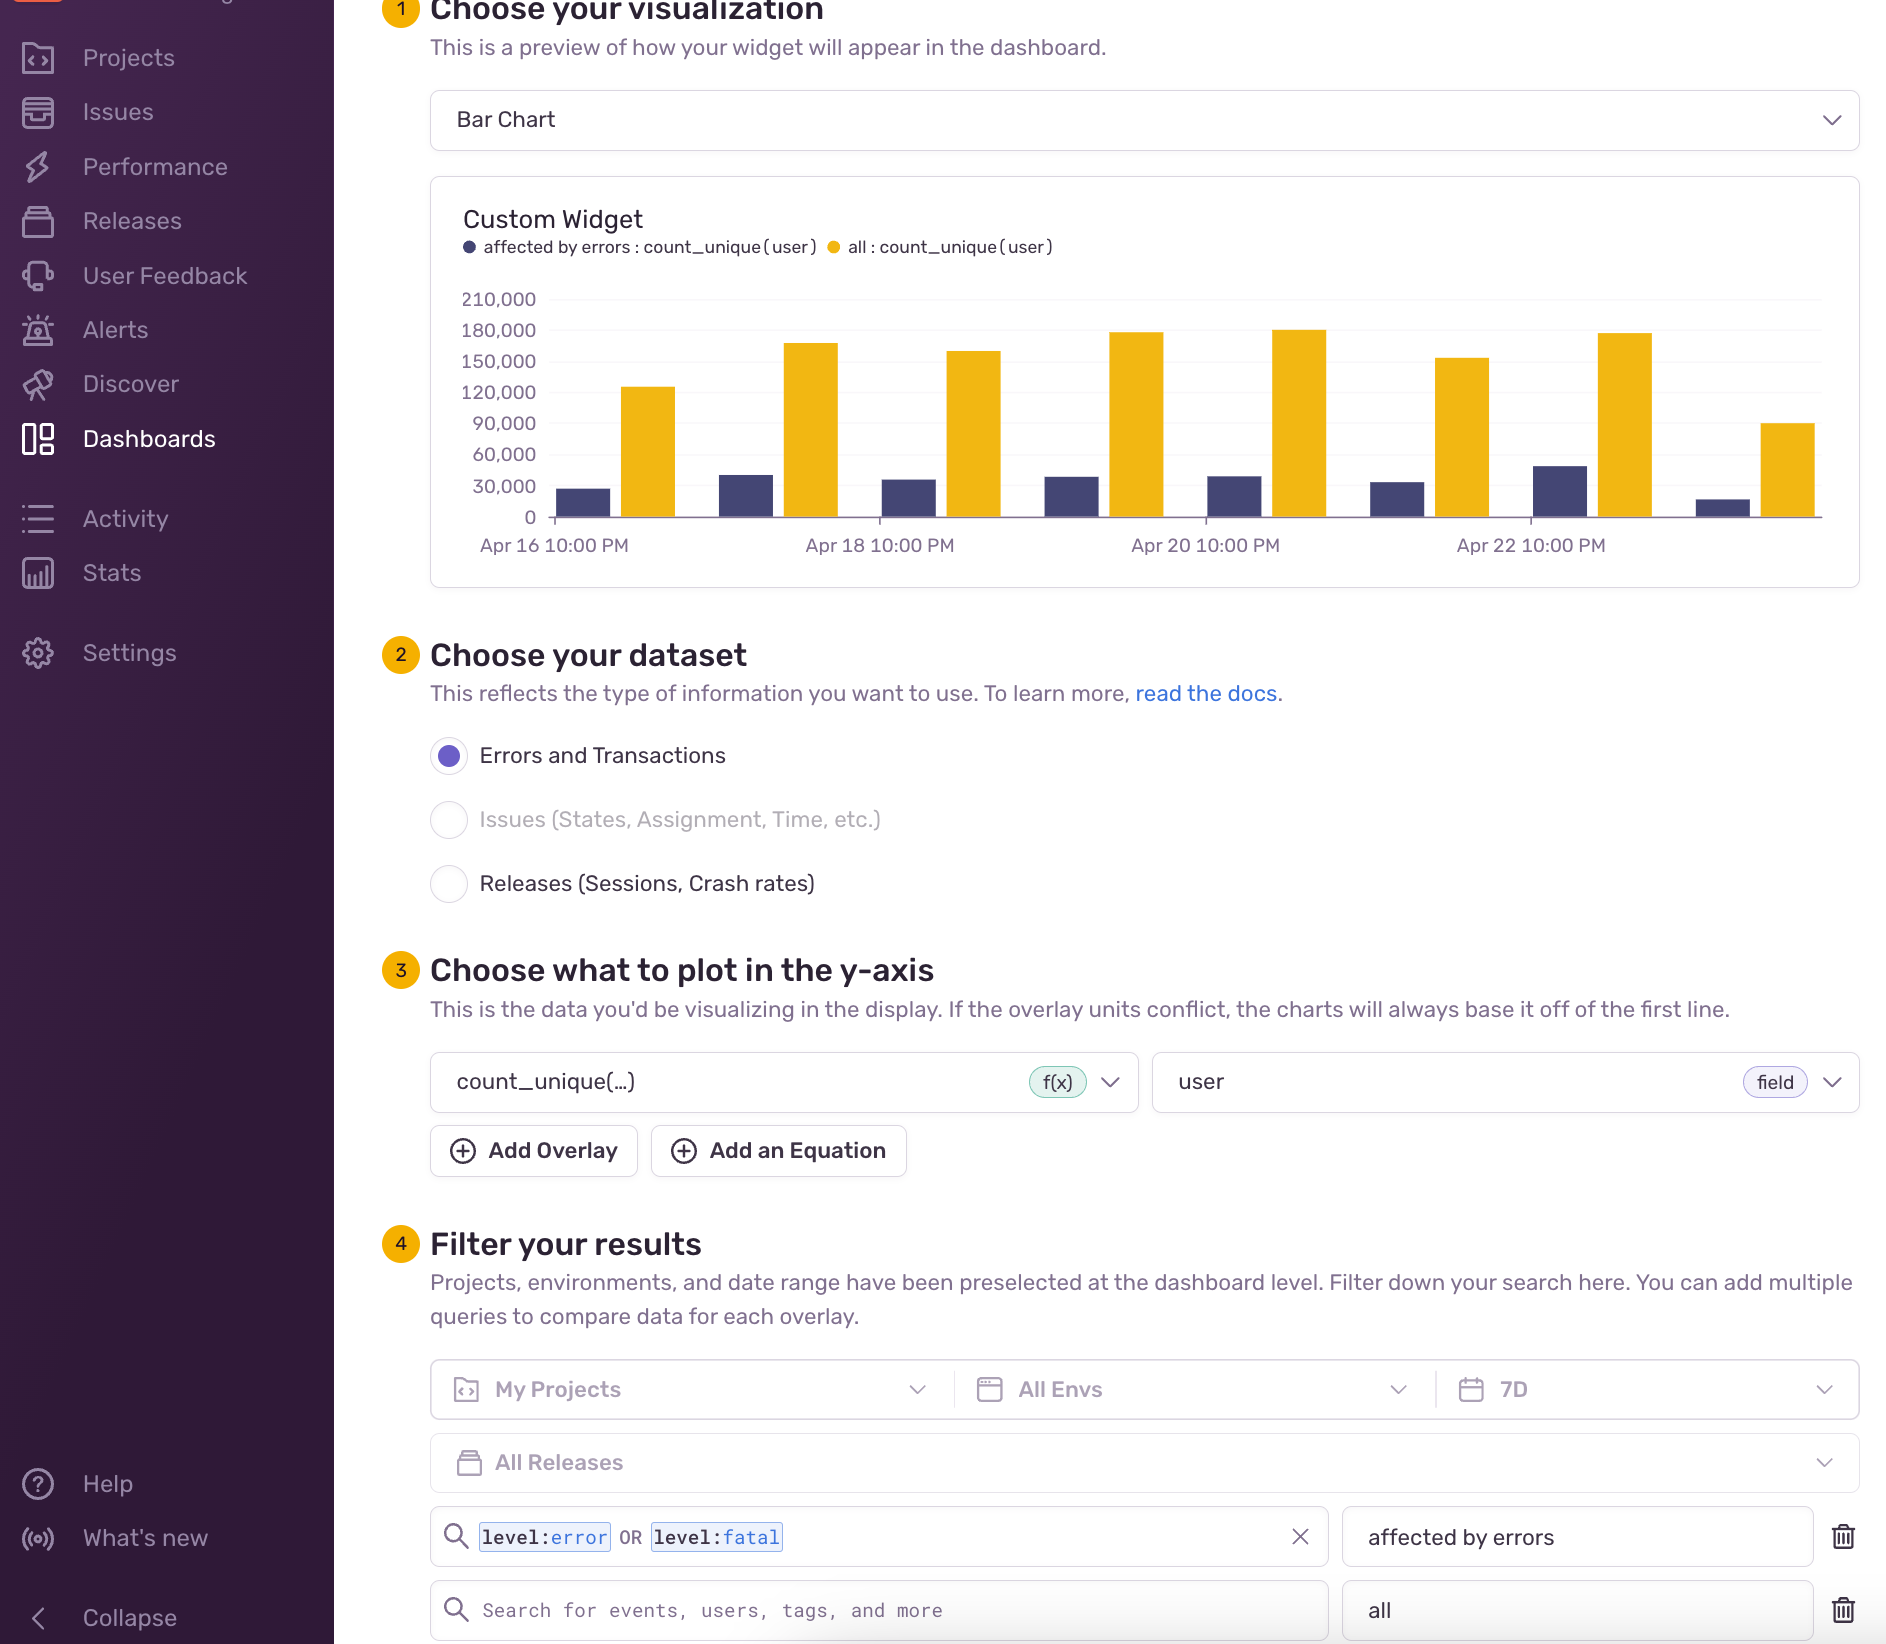
Sentry에서 제공하는 여러 지표들로 Chart나 Table을 만들어서 볼 수 있는 Dashboards를 센트리는 제공하고 있다.
다음과 같이 user affected by error 정보를 확인해볼 수 있다.

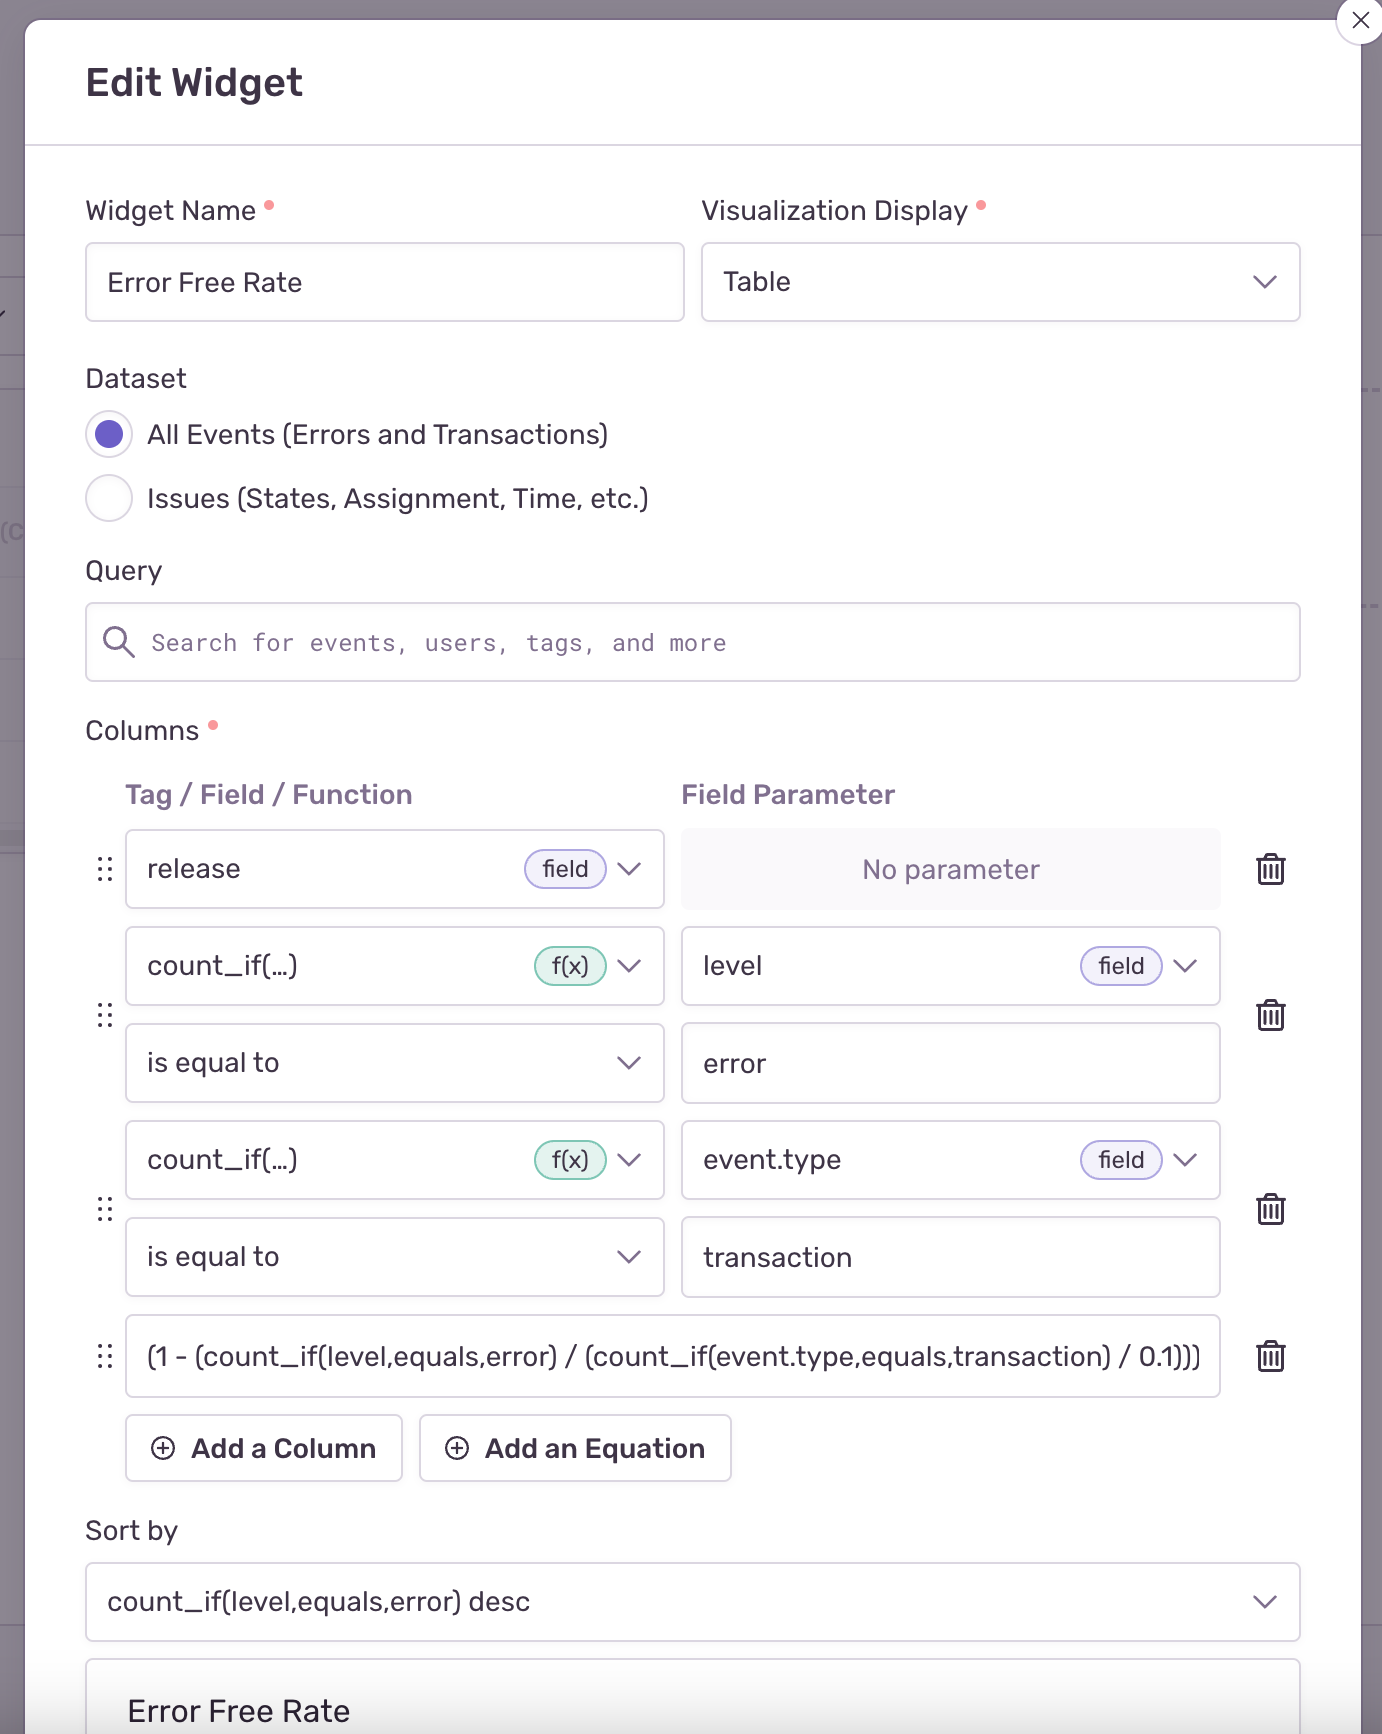
또한 다음과 같이 table columns에 계산값을 넣어서 확인하는 것도 가능하다.
(1 - (count_if(level,equals,error) / (count_if(event.type,equals,transaction) / 0.1))) * 100

소스맵 설정
sentry로 소스맵을 올리기 위해서는 @sentry/cli가 필요하다.
@sentry/webpack-plugin에도 @sentry/cli에 디펜던시가 있어서 @sentry/webpack-plugin 설치를 통해서도 소스맵 설정이 가능하다.
// yarn.lock

"@sentry/webpack-plugin@^1.18.9":
  version "1.18.9"
  resolved "https://registry.yarnpkg.com/@sentry/webpack-plugin/-/webpack-plugin-1.18.9.tgz#acb48c0f96fdb9e73f1e1db374ea31ded6d883a8"
  integrity sha512-+TrenJrgFM0QTOwBnw0ZXWMvc0PiOebp6GN5EbGEx3JPCQqXOfXFzCaEjBtASKRgcNCL7zGly41S25YR6Hm+jw==
  dependencies:
    "@sentry/cli" "^1.74.4"
sentry-cli를 위한 config 파일은 직접 만들어줘야 한다. (공식문서 : https://docs.sentry.io/cli/configuration/)
vi ~/.sentryclirc
[defaults]
url=전송할 센트리 서버 빌드 url
org=전송할 센트리 서버에 있고 token을 발급한 유저가 권한이 있는 조직
project= 전송할 센트리 서버에 있고 token을 발급한 유저가 권한이 있는 조직안의 프로젝트

[auth]
token=발급된 Auth Token 붙여넣기
위의 auth token은 Sentry 대시보드에서 발급받는다.
- 유저 프로필 > API keys > Create New Token > 발급된 Auth token을 복사
Sentry SDK Tree Shaking
sentry sdk에 tree shaking을 적용하고 싶다면, 다음과 같이 __SENTRY_DEBUG__, __SENTRY_TRACING__ flag를 false로 설정한다.
단 __SENTRY_TRACING__ 은 sdk의 성능 모니터링 관련 기능을 사용한다면 false로 하지 않아야 한다.
const webpack = require('webpack');

module.exports = {
  // ... other options
  plugins: [
    new webpack.DefinePlugin({
      __SENTRY_DEBUG__: false,
      __SENTRY_TRACING__: false,
    }),
    // ... other plugins
  ],
};
자세한 내용은 Sentry Tree Shaking을 참고한다.